Piano in JavaScript: Web Audio Tutorial + Code
A piano is the most satisfying thing you can build with the Web Audio API, because you get sound the moment you click. In this tutorial you will build a complete piano in JavaScript with plain HTML, CSS and JavaScript: white and black keys that really overlap, notes made from scratch with an oscillator (no audio files, no libraries), a mouse and keyboard that both play, real multi-touch for phones, a volume and a sustain control, and a button that records what you play and plays it back.
You can type along in the free WSNCode online code editor, or open the finished piano with one click from the Try It Live button further down. Three things in this web audio API tutorial are usually skipped by other guides, so watch for them: how to stop notes from clicking (the gain envelope), how to get around the browser rule that blocks sound until the user acts, and how to make several fingers play at the same time.
What You'll Build
This is a small but complete virtual piano with HTML, CSS and JavaScript. The finished piano has:
- 18 keys (11 white and 7 black, from C4 to F5) laid out with CSS, which shrink to fit a phone screen.
- Sound made with the Web Audio API: no
.mp3or.wavfiles to download, so it works anywhere, even in a sandbox. - The real note frequency formula,
440 × 2(n − 49) / 12, instead of a hand-typed table. - Mouse, touch and keyboard play: click, drag across the keys, tap with several fingers, or type A S D F G with W E T Y U for the black keys.
- A key press animation: the key sinks and lights up while it sounds.
- Volume and sustain sliders.
- Record and play back for any tune you play.
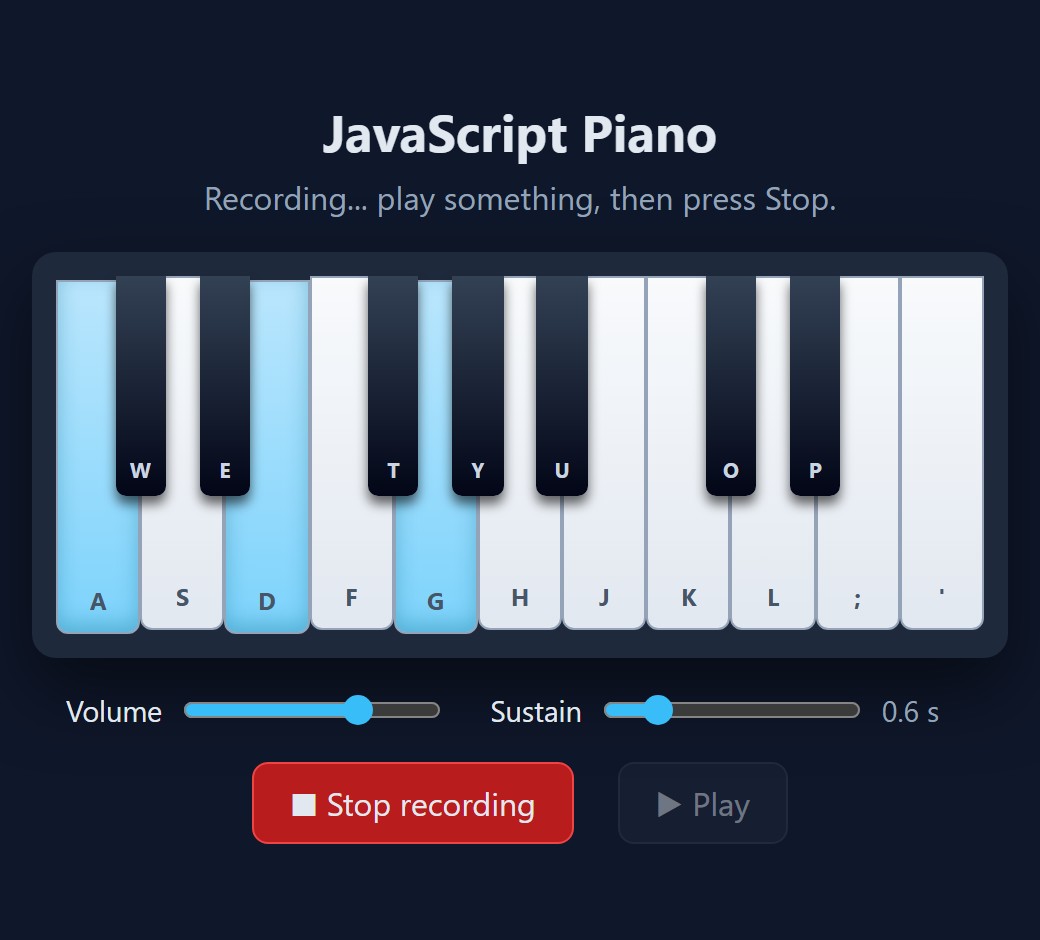
The whole piano is about 210 lines of JavaScript, about 45 lines of HTML and 125 lines of CSS, and it contains no image and no sound file.
Where the Idea Comes From: Piano on WSNCode
This post grew out of a small project I first made and published on WSNCode myself. You can play my original Piano project here, open the View Code button to read its source, and fork it into the editor. It has one octave (C4 to B4), a triangle-wave oscillator and a gain that fades each note out over 0.8 seconds, and it creates fresh nodes for every click so fast notes can overlap. It works well as a first version, and it is a good example of what comes next.
It also has limits that this tutorial fixes: the keys have fixed widths in pixels, so the keyboard does not fit a narrow phone; every note lasts exactly 0.8 seconds, whether you hold the key or not; only the mouse and touch can play it; and there is no volume control and no recording. The version below keeps the same idea, a triangle oscillator and a fading gain, and rebuilds it into a small program you can understand line by line. If you like this kind of project, the series also covers the Tic Tac Toe game, the Snake game, the Flappy Bird game and the Word Scramble game.
How the Piano Works
A piano needs three things: keys (HTML elements the player can press), a note for every key (a frequency in hertz), and a sound engine that turns a frequency into a tone and fades it in and out. Everything else, the mouse, the keyboard, the fingers and the recorder, is just a different way of calling the same two functions: pressKey(note) and releaseKey(note). Keep that in mind, because it is why this program stays small. The recorder does not need its own sound code. It only has to remember which key went down and up, and when.
Step 1: The HTML Piano Keys
Each key is a <button> with a data-note attribute such as C4 or C#4, so JavaScript always knows which note a key plays. White and black keys use the same markup and differ only in a class. An aria-label gives screen readers a name for every key (“C sharp 4”), because an empty button has no text.
The black keys are written after all the white keys, and each one has an inline --pos value: the number of white keys to its left. --pos: 1 means “one white key to my left”, so that black key is C#, between C and D. You will see in Step 2 how CSS turns this number into a position. There is no black key between E and F, or between B and C, exactly like on a real piano, so the numbers skip 3 and 7.
Every key has tabindex="-1". The computer keyboard plays the notes, so we do not want 18 extra Tab stops in front of the sliders. New to HTML? Read HTML, CSS and JavaScript Explained first.
<main class="app">
<h1>JavaScript Piano</h1>
<p id="status" role="status">Click a key or press A S D F G on your keyboard.</p>
<div class="piano-frame">
<div id="piano" class="piano" role="group" aria-label="Piano keyboard, C4 to F5">
<button class="key white" data-note="C4" aria-label="C4" tabindex="-1"></button>
<button class="key white" data-note="D4" aria-label="D4" tabindex="-1"></button>
<button class="key white" data-note="E4" aria-label="E4" tabindex="-1"></button>
<button class="key white" data-note="F4" aria-label="F4" tabindex="-1"></button>
<button class="key white" data-note="G4" aria-label="G4" tabindex="-1"></button>
<button class="key white" data-note="A4" aria-label="A4" tabindex="-1"></button>
<button class="key white" data-note="B4" aria-label="B4" tabindex="-1"></button>
<button class="key white" data-note="C5" aria-label="C5" tabindex="-1"></button>
<button class="key white" data-note="D5" aria-label="D5" tabindex="-1"></button>
<button class="key white" data-note="E5" aria-label="E5" tabindex="-1"></button>
<button class="key white" data-note="F5" aria-label="F5" tabindex="-1"></button>
<button class="key black" data-note="C#4" aria-label="C sharp 4" tabindex="-1" style="--pos: 1"></button>
<button class="key black" data-note="D#4" aria-label="D sharp 4" tabindex="-1" style="--pos: 2"></button>
<button class="key black" data-note="F#4" aria-label="F sharp 4" tabindex="-1" style="--pos: 4"></button>
<button class="key black" data-note="G#4" aria-label="G sharp 4" tabindex="-1" style="--pos: 5"></button>
<button class="key black" data-note="A#4" aria-label="A sharp 4" tabindex="-1" style="--pos: 6"></button>
<button class="key black" data-note="C#5" aria-label="C sharp 5" tabindex="-1" style="--pos: 8"></button>
<button class="key black" data-note="D#5" aria-label="D sharp 5" tabindex="-1" style="--pos: 9"></button>
</div>
</div>
<div class="controls">
<label>Volume
<input id="volume" type="range" min="0" max="100" value="70">
</label>
<label>Sustain
<input id="sustain" type="range" min="1" max="30" value="6">
<output id="sustain-value">0.6 s</output>
</label>
</div>
<div class="controls">
<button id="record" type="button">● Record</button>
<button id="play" type="button" disabled>▶ Play</button>
</div>
</main>Step 2: CSS Layout for Black Keys That Overlap White Keys
The white keys are the easy part: the piano is a flex container, and flex: 1 on every white key makes them share the width equally. Because the keys are fractions of the piano, not pixels, the whole keyboard scales to any screen.
The black keys are the interesting part. They use position: absolute, so they float on top of the white keys without taking up any space in the flex row, and z-index: 2 keeps them above. Each black key is 60% as wide as a white key, and its left value does the clever work:
left: calc(100% / var(--whites) * (var(--pos) - 0.3));100% / var(--whites) is the width of one white key (the piano is 11 white keys wide). Multiplying by --pos gives the x position of the line between two white keys, and subtracting 0.3 of a key moves the black key left by half of its own width (60% divided by 2), so it sits exactly on that line. Many tutorials do this with negative margins and fixed pixel widths. The percentage version keeps working when the piano is resized.
Three more details matter. touch-action: none tells a phone not to scroll or zoom when a finger touches the piano, which is essential for playing. user-select: none stops text from being selected when you drag across keys. And the .down classes are the key press animation: a pressed white key turns light blue and moves down by 2 pixels, and a pressed black key turns bright blue and shrinks slightly. The transition makes the change smooth. JavaScript only has to add and remove one class. If you want to learn more about layout, read our CSS Flexbox guide next.
* { box-sizing: border-box; }

body {
  margin: 0;
  min-height: 100vh;
  display: grid;
  place-items: center;
  background: #0f172a;
  color: #e2e8f0;
  font-family: system-ui, "Segoe UI", sans-serif;
}

.app {
  width: min(100%, 800px);
  padding: 16px;
  text-align: center;
}

h1 { margin: 0 0 6px; font-size: 1.6rem; }
#status { margin: 0 0 16px; min-height: 1.4em; color: #94a3b8; }

/* The wooden frame around the keys */
.piano-frame {
  padding: 12px 12px 14px;
  border-radius: 12px;
  background: #1e293b;
  box-shadow: 0 16px 36px rgba(0, 0, 0, 0.5);
}

/* White keys are flex items, black keys are positioned on top of them */
.piano {
  --whites: 11;
  position: relative;
  display: flex;
  height: clamp(150px, 34vw, 230px);
  touch-action: none;          /* no scrolling or zooming while playing */
  user-select: none;
  -webkit-user-select: none;
  -webkit-touch-callout: none;
}

.key {
  position: relative;
  margin: 0;
  padding: 0;
  border: 0;
  cursor: pointer;
  font: inherit;
  transform-origin: top center;
  transition: transform 80ms ease, background 80ms ease, box-shadow 80ms ease;
  -webkit-tap-highlight-color: transparent;
}

.white {
  flex: 1;
  background: linear-gradient(#f8fafc, #e2e8f0);
  border: 1px solid #94a3b8;
  border-radius: 0 0 6px 6px;
}

.black {
  position: absolute;
  top: 0;
  z-index: 2;
  width: calc(100% / var(--whites) * 0.6);
  height: 62%;
  /* --pos is the number of white keys to the left of this black key */
  left: calc(100% / var(--whites) * (var(--pos) - 0.3));
  background: linear-gradient(#334155, #020617);
  border-radius: 0 0 5px 5px;
  box-shadow: 0 4px 6px rgba(0, 0, 0, 0.6);
}

/* Key pressed: the key sinks and lights up */
.white.down {
  background: linear-gradient(#bae6fd, #7dd3fc);
  transform: translateY(2px);
  box-shadow: inset 0 -4px 10px rgba(14, 116, 144, 0.35);
}

.black.down {
  background: linear-gradient(#0ea5e9, #0369a1);
  transform: translateY(2px) scaleY(0.98);
  box-shadow: 0 1px 2px rgba(0, 0, 0, 0.6);
}

/* Computer-keyboard letter at the bottom of each key */
.hint {
  position: absolute;
  left: 50%;
  bottom: 8px;
  transform: translateX(-50%);
  font-size: 0.75rem;
  font-weight: 700;
  pointer-events: none;
}
.white .hint { color: #475569; }
.black .hint { color: #cbd5e1; bottom: 6px; font-size: 0.65rem; }

.controls {
  display: flex;
  flex-wrap: wrap;
  justify-content: center;
  align-items: center;
  gap: 12px 22px;
  margin-top: 16px;
}

label { display: flex; align-items: center; gap: 8px; font-size: 0.9rem; }
output { min-width: 3.2em; text-align: left; color: #94a3b8; }
input[type="range"] { width: 130px; accent-color: #38bdf8; }

button:not(.key) {
  padding: 9px 18px;
  border: 1px solid #334155;
  border-radius: 8px;
  background: #1e293b;
  color: inherit;
  font: inherit;
  cursor: pointer;
}
button:not(.key):hover:not(:disabled) { background: #334155; }
button:not(.key):disabled { opacity: 0.45; cursor: default; }
button.is-on { background: #b91c1c; border-color: #ef4444; }

button:focus-visible, input:focus-visible { outline: 3px solid #facc15; outline-offset: 2px; }
Step 3: Notes, Elements and the Keyboard Map
Now the JavaScript. At the top we grab the elements we need once. keyByNote is an object that maps a note name to its button, so we can light up the right key without searching the page every time. KEY_TO_NOTE is the computer keyboard layout. It copies the shape of a piano: the home row (A S D F G H J K L ; ') plays the white keys and the row above (W E T Y U O P) plays the black keys, and each black key sits on the keyboard between the two white keys it sits between on screen. Then a loop writes the matching letter on every key, so the player never has to guess.
// ===== Elements and settings
const piano = document.getElementById('piano');
const statusEl = document.getElementById('status');
const volumeInput = document.getElementById('volume');
const sustainInput = document.getElementById('sustain');
const sustainValue = document.getElementById('sustain-value');
const recordBtn = document.getElementById('record');
const playBtn = document.getElementById('play');

const NOTE_NAMES = ['C', 'C#', 'D', 'D#', 'E', 'F', 'F#', 'G', 'G#', 'A', 'A#', 'B'];

// Computer keyboard -> note. The home row plays the white keys, the row above plays the black keys.
const KEY_TO_NOTE = {
  a: 'C4', w: 'C#4', s: 'D4', e: 'D#4', d: 'E4', f: 'F4', t: 'F#4', g: 'G4', y: 'G#4',
  h: 'A4', u: 'A#4', j: 'B4', k: 'C5', o: 'C#5', l: 'D5', p: 'D#5', ';': 'E5', "'": 'F5',
};

const keyByNote = {};
piano.querySelectorAll('.key').forEach((el) => { keyByNote[el.dataset.note] = el; });

// Show the matching computer key on every piano key
Object.entries(KEY_TO_NOTE).forEach(([letter, note]) => {
  const hint = document.createElement('span');
  hint.className = 'hint';
  hint.textContent = letter.toUpperCase();
  keyByNote[note].appendChild(hint);
});
Step 4: The Note Frequency Formula
How does a computer know that A4 should sound at 440 Hz? On a standard piano the 88 keys are numbered from 1 to 88, and A4 is key number 49. Each key is one semitone higher than the one before, and 12 semitones make an octave, which doubles the frequency. That means one semitone multiplies the frequency by the 12th root of 2, which is about 1.0595. Starting from A4, the frequency of key n is:
frequency = 440 * 2 ** ((n - 49) / 12)Let us check it. For C5, which is 12 keys above C4, the exponent is exactly one more than for C4, so the result is exactly twice as high. For the A below A4 (n = 37) the exponent is −1, so you get 220 Hz. The function noteToKeyNumber turns a name like C#4 into n: it counts 12 keys for every octave and adds the position of the note in the octave (C is 0, C# is 1, and so on up to B at 11). Here are the numbers the game's own code gives:
Note                  Key #   Frequency
C4  (middle C)        key 40    261.63 Hz
C#4  (black key)      key 41    277.18 Hz
D4                    key 42    293.66 Hz
E4                    key 44    329.63 Hz
F4                    key 45    349.23 Hz
G4                    key 47    392.00 Hz
A4  (concert pitch)   key 49    440.00 Hz
B4                    key 51    493.88 Hz
C5  (one octave up)   key 52    523.25 Hz
There is no frequency table to type or to get wrong. Want to add a lower octave? Add buttons with the names C3 to B3 and the formula works for them too.
// ===== Note frequencies
// Piano key number: A0 is key 1, middle C (C4) is key 40 and A4 (440 Hz) is key 49.
function noteToKeyNumber(note) {
  const name = note.slice(0, -1);          // "C#"
  const octave = Number(note.slice(-1));   // 4
  return 12 * (octave - 1) + 4 + NOTE_NAMES.indexOf(name);
}

// Every key up the keyboard is the 12th root of 2 (about 1.0595) times higher than the one before it.
function noteFrequency(note) {
  const n = noteToKeyNumber(note);
  return 440 * Math.pow(2, (n - 49) / 12);
}
Step 5: Making Sound with the Web Audio API
This is the heart of the web audio API tutorial. The Web Audio API works like a modular synthesizer: you create small nodes and connect them with cables. Our piano uses three kinds:
- An OscillatorNode that makes a repeating wave at a given frequency. We use the
triangleshape, which sounds softer than a square or a sawtooth wave and richer than a plain sine. - A GainNode for each note, called
env(envelope), which controls how loud that one note is over time. - One master GainNode that all notes pass through, which is the volume knob. It is connected to
audioCtx.destination, which means your speakers.
Unlocking audio on the first click
Browsers do not allow a page to make sound until the user has clicked, tapped or pressed a key. If you create an AudioContext when the page loads, it starts in the suspended state and stays silent. Our getAudio() function creates the context the first time it is needed, and every note starts from a click, a touch or a key press, so the context is created inside a user action and starts running at once. If it is suspended anyway (this can happen in Safari, or after a long pause), the function calls resume(). The Record and Play buttons also call it, because playback runs from timers, which are not user actions.
This matters in the WSNCode editor, because the preview is a sandboxed iframe (sandbox="allow-scripts"), which is the strictest case. The piano works there for the same reason: sound starts from your click inside the preview.
// ===== Audio engine (Web Audio API, no sound files)
const ATTACK = 0.01;         // seconds to fade in, so a note never starts with a click
const DECAY = 0.8;           // seconds to drop from the peak to the sustain level
const PEAK = 0.4;
const SUSTAIN_LEVEL = 0.2;

let audioCtx = null;
let master = null;           // one volume control for everything
let volume = 0.7;
let releaseTime = 0.6;       // seconds a note rings after you let go (the "sustain" slider)
const voices = new Map();    // notes that are held down right now: note -> { osc, env }

// Browsers keep audio locked until the user clicks or presses a key,
// so we create and resume the AudioContext inside those events.
function getAudio() {
  if (!audioCtx) {
    const AudioContextClass = window.AudioContext || window.webkitAudioContext;
    audioCtx = new AudioContextClass();
    master = audioCtx.createGain();
    master.gain.value = volume * volume;
    master.connect(audioCtx.destination);
  }
  if (audioCtx.state === 'suspended') audioCtx.resume();
  return audioCtx;
}
Playing a note without a click: the gain envelope
If you start an oscillator at full volume and stop it a moment later, you hear a click, because the wave jumps from silence to loud (and back) in a single sample. Real instruments never do that. A piano note rises very quickly, fades slowly and dies away after you let go. We copy that shape with the gain envelope:
- Attack: in 10 milliseconds the gain rises from almost 0 to
PEAK(0.4). - Decay: over the next 0.8 seconds it falls to
SUSTAIN_LEVEL(0.2). - Sustain: it stays at that level while the key is down.
- Release: when you let go, it fades to silence over
releaseTime, then the oscillator stops.
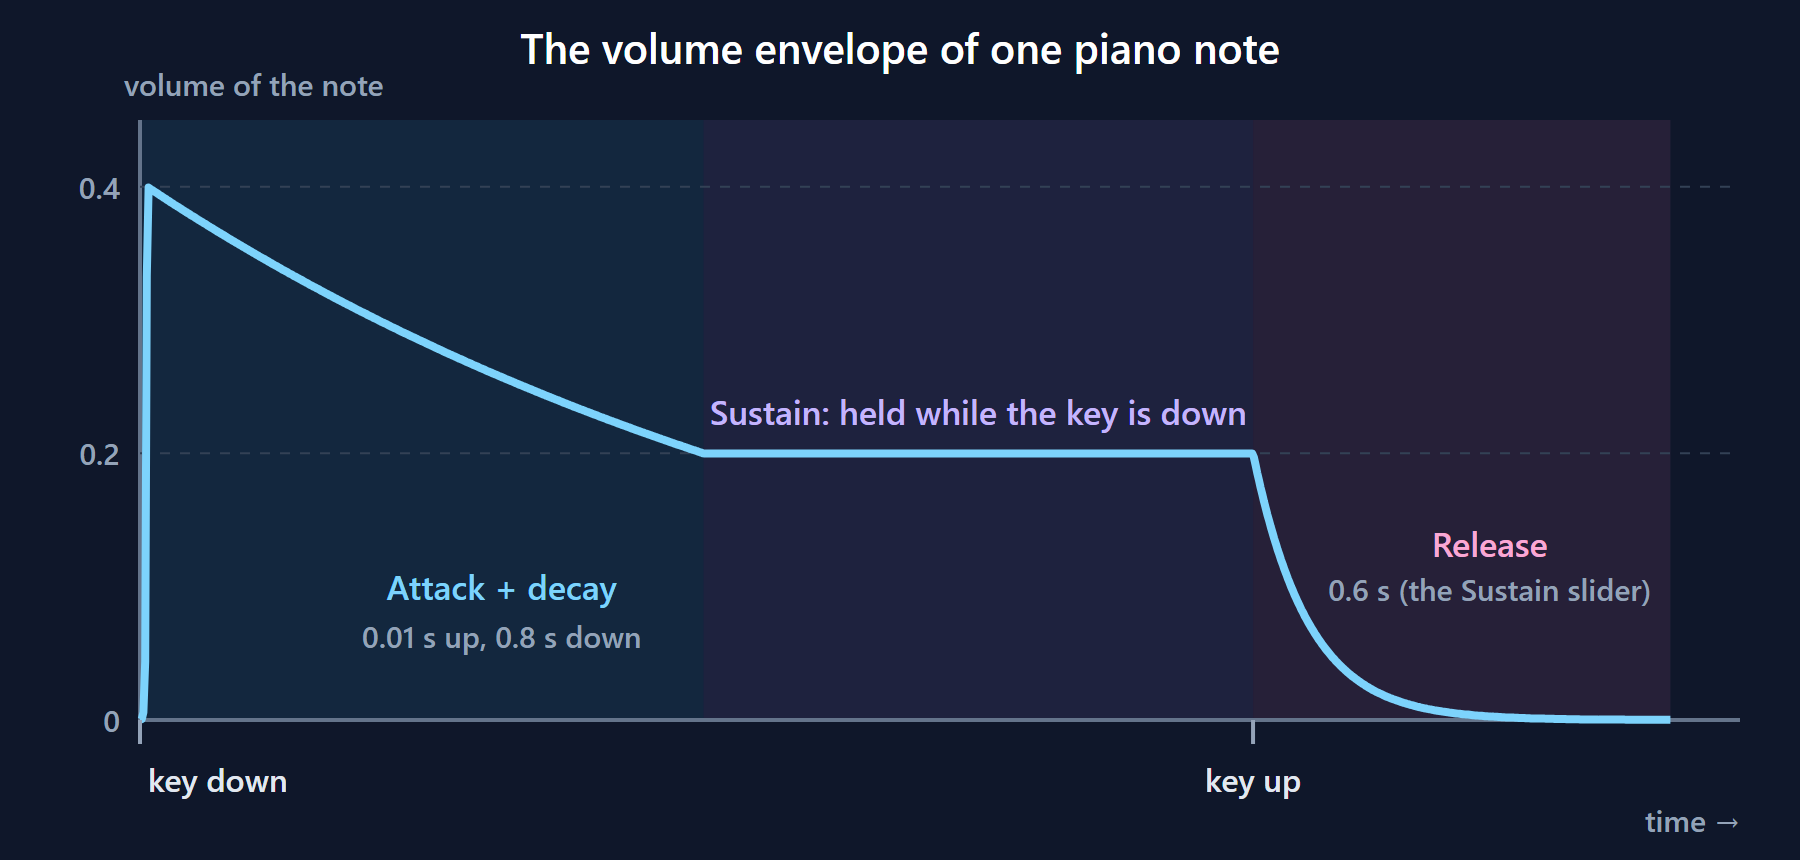
The chart above is drawn from the same numbers as the code. exponentialRampToValueAtTime is used instead of a straight line because loudness is perceived on a curve: an exponential fade sounds smooth, a linear one sounds like it drops suddenly at the end. The one rule is that an exponential ramp cannot start or end at exactly 0, so we use 0.0001, which is about 70 decibels below the peak and cannot be heard.
Two more details. An oscillator can only be started once, so we make a new one for every note. That is cheap, and it also means that notes never block each other, so you can play chords. And when a note ends, onended disconnects its nodes so the browser can free them.
In stopNote the order of the three gain calls matters. cancelScheduledValues removes the rest of the plan (for example the decay that is still running), setValueAtTime(env.gain.value, now) pins the gain at the value it has right now, and only then do we ramp down. Skip the pin and the volume would jump to the start of the ramp.
function startNote(note) {
  const ctx = getAudio();
  const now = ctx.currentTime;

  const osc = ctx.createOscillator();
  osc.type = 'triangle';
  osc.frequency.value = noteFrequency(note);

  // The gain "envelope": fade in, drop a little, then hold until the key is released.
  // exponentialRamp cannot start from 0, so we use a very small number instead.
  const env = ctx.createGain();
  env.gain.setValueAtTime(0.0001, now);
  env.gain.exponentialRampToValueAtTime(PEAK, now + ATTACK);
  env.gain.exponentialRampToValueAtTime(SUSTAIN_LEVEL, now + ATTACK + DECAY);

  osc.connect(env);
  env.connect(master);
  osc.start(now);
  voices.set(note, { osc, env });
}
function stopNote(note) {
const voice = voices.get(note);
if (!voice) return;
voices.delete(note);
const now = audioCtx.currentTime;
// Start the fade-out from the volume the note has right now
voice.env.gain.cancelScheduledValues(now);
voice.env.gain.setValueAtTime(voice.env.gain.value, now);
voice.env.gain.exponentialRampToValueAtTime(0.0001, now + releaseTime);
voice.osc.stop(now + releaseTime + 0.05);
voice.osc.onended = () => { voice.osc.disconnect(); voice.env.disconnect(); };
}Step 6: Pressing and Releasing Keys
Here is the shared part that I mentioned in the beginning. pressKey starts the sound, adds the .down class for the animation and tells the recorder. releaseKey does the reverse. The voices map holds every note that is down right now, which gives us two things for free: the guard if (voices.has(note)) return stops the keyboard's auto-repeat (a held key sends many keydown events) from restarting the note again and again, and releaseAll can release everything at once, which we use to avoid stuck notes.
// ===== Pressing and releasing keys
function pressKey(note) {
  if (voices.has(note)) return;            // already down (keyboard auto-repeat, two fingers)
  startNote(note);
  keyByNote[note].classList.add('down');
  record(note, 'down');
}

function releaseKey(note) {
  if (!voices.has(note)) return;
  stopNote(note);
  keyByNote[note].classList.remove('down');
  record(note, 'up');
}

function releaseAll() {
  [...voices.keys()].forEach(releaseKey);
}
Step 7: Mouse and Touch with Multi-Touch Support
We could write one handler for mousedown and one for touchstart, but pointer events do both at once. A mouse, a finger and a pen all send the same pointerdown, pointerover and pointerup events, and every finger gets its own pointerId. That is what makes multi-touch work: the pointers map remembers which note each pointer holds, so three fingers play three keys, and lifting one finger releases only its note.
There are three little tricks in this code:
- Sliding. On a touch screen, the browser locks all events of a finger to the first element it touched.
releasePointerCaptureremoves that lock, sopointeroverfires when you slide onto the next key and you can play a glissando with the mouse or a finger. Thepointeroverhandler releases the old note and presses the new one. - Letting go anywhere.
pointerupandpointercancelare listened to onwindow, not on the piano, so a note ends even if you release the mouse outside the keyboard or the phone cancels the touch (for example when a notification appears). - No long-press menu. Holding a finger down on a phone normally opens a context menu. Cancelling the
contextmenuevent stops that.
One mistake to avoid, which I made while testing: do not call e.preventDefault() in the pointerdown handler. It looks harmless, because touch-action: none already stops scrolling, but in my tests in Chrome it also stopped the browser from moving focus into the page. In the WSNCode editor the preview iframe then never received focus, so the computer keyboard stopped working after you clicked a key. Without the preventDefault, one click on the preview gives the iframe focus and the keyboard works.
// ===== Mouse and touch (pointer events, so every finger counts)
const pointers = new Map();                // pointerId -> note that finger or mouse is holding

piano.addEventListener('pointerdown', (e) => {
  const key = e.target.closest('.key');
  if (!key || e.button !== 0) return;
  // Touch screens lock all events to the first key you touch. Let go of that lock
  // so you can slide a finger across the keys.
  if (key.hasPointerCapture(e.pointerId)) key.releasePointerCapture(e.pointerId);
  pointers.set(e.pointerId, key.dataset.note);
  pressKey(key.dataset.note);
});

piano.addEventListener('pointerover', (e) => {
  const key = e.target.closest('.key');
  if (!key || !pointers.has(e.pointerId)) return;
  const previous = pointers.get(e.pointerId);
  if (previous === key.dataset.note) return;
  pointers.set(e.pointerId, key.dataset.note);
  releaseKey(previous);
  pressKey(key.dataset.note);
});

function endPointer(e) {
  if (!pointers.has(e.pointerId)) return;
  const note = pointers.get(e.pointerId);
  pointers.delete(e.pointerId);
  releaseKey(note);
}
window.addEventListener('pointerup', endPointer);
window.addEventListener('pointercancel', endPointer);
piano.addEventListener('contextmenu', (e) => e.preventDefault());   // no long-press menu
Step 8: Playing with the Computer Keyboard
The keyboard handlers are short because all the work is done by pressKey and releaseKey. On keydown we ignore auto-repeat (e.repeat) and any key combined with Ctrl, Cmd or Alt, so shortcuts such as Ctrl+A still work. We look up e.key.toLowerCase() in the map (so Caps Lock does not break anything), call preventDefault for our own keys only, which also stops the ' key from opening quick-find in Firefox, and play the note. keyup releases it.
The blur listener at the end is a small detail that prevents a big annoyance. If you hold a key and switch to another window, the page never sees the key-up, and the note would play for ever. When the window loses focus we release everything.
In the editor preview, click once on the piano before you type so that the keyboard goes to the preview and not to the code editor.
// ===== Computer keyboard
document.addEventListener('keydown', (e) => {
  if (e.repeat || e.ctrlKey || e.metaKey || e.altKey) return;
  const note = KEY_TO_NOTE[e.key.toLowerCase()];
  if (!note) return;
  e.preventDefault();
  pressKey(note);
});

document.addEventListener('keyup', (e) => {
  const note = KEY_TO_NOTE[e.key.toLowerCase()];
  if (note) releaseKey(note);
});

// If the window loses focus we never see the key-up, so let go of everything
window.addEventListener('blur', () => { pointers.clear(); releaseAll(); });
Step 9: Sustain and Volume Controls
The volume slider sets the master gain. We square the value (volume * volume) because we hear loudness on a curve: with a straight mapping, most of the change would happen in the first part of the slider and the rest would feel flat. We also use setTargetAtTime, which glides to the new value in a few milliseconds, instead of setting it at once, because an instant jump while a note is playing makes a crackle. The sustain slider controls releaseTime, which is the length of the release in Step 5. At 0.1 seconds the piano sounds dry and short. At 2.5 seconds each note rings on after you let go, like a piano with the sustain pedal pressed.
// ===== Volume and sustain
volumeInput.addEventListener('input', () => {
  volume = Number(volumeInput.value) / 100;
  // Squaring makes the slider feel even to your ears. setTargetAtTime avoids crackles.
  if (master) master.gain.setTargetAtTime(volume * volume, audioCtx.currentTime, 0.02);
});

sustainInput.addEventListener('input', () => {
  releaseTime = Number(sustainInput.value) / 10;
  sustainValue.textContent = releaseTime.toFixed(1) + ' s';
});
Step 10: Record and Play Back What You Play
Because every key goes through pressKey and releaseKey, recording is simple. While recording is on, those two functions push an event into the song array: { note: 'C4', type: 'down', time: 1234 }. The time is the number of milliseconds since you pressed Record. A recording is only a list of events with times, so it takes almost no memory.
Playback goes through the list and uses setTimeout to call pressKey or releaseKey at the right moment. Because it uses the same functions as a human player, the keys light up and the sound plays with no extra code. Three details make it feel right. First, times are counted from the first note, not from the Record click, so the pause before you start is skipped. Second, stopping the recording releases any key you are still holding, so no recorded note stays open. Third, the Play button turns into a Stop button during playback and cancels every pending timer, so you can interrupt a song at any moment. The buttons also guard against each other: Record stops playback, and Play is disabled while recording.
// ===== Record and play back
let recording = false;
let playing = false;
let song = [];                             // [{ note, type: 'down' | 'up', time }]
let startedAt = 0;
let playTimers = [];

function record(note, type) {
  if (!recording) return;
  song.push({ note, type, time: performance.now() - startedAt });
}

function setStatus(text) { statusEl.textContent = text; }

function updateButtons() {
  recordBtn.textContent = recording ? '■ Stop recording' : '● Record';
  recordBtn.classList.toggle('is-on', recording);
  playBtn.textContent = playing ? '■ Stop' : '▶ Play';
  playBtn.disabled = recording || song.length === 0;
}

recordBtn.addEventListener('click', () => {
  getAudio();
  if (recording) {
    releaseAll();                          // finish any note you are still holding
    recording = false;
    const notes = song.filter((s) => s.type === 'down').length;
    setStatus(notes ? 'Recorded ' + notes + ' notes. Press Play to hear them.' : 'Nothing recorded.');
  } else {
    stopPlayback();
    song = [];
    startedAt = performance.now();
    recording = true;
    setStatus('Recording... play something, then press Stop.');
  }
  updateButtons();
});

function stopPlayback() {
  playTimers.forEach(clearTimeout);
  playTimers = [];
  playing = false;
  releaseAll();
  updateButtons();
}

playBtn.addEventListener('click', () => {
  getAudio();
  if (playing) { stopPlayback(); setStatus('Stopped.'); return; }
  if (!song.length) return;
  releaseAll();
  playing = true;
  const offset = song[0].time;             // start at the first note, not at the Record click
  song.forEach((s) => {
    const timer = setTimeout(() => (s.type === 'down' ? pressKey(s.note) : releaseKey(s.note)), s.time - offset);
    playTimers.push(timer);
  });
  const total = song[song.length - 1].time - offset;
  playTimers.push(setTimeout(() => { stopPlayback(); setStatus('Done. Press Play to hear it again.'); }, total + releaseTime * 1000 + 100));
  setStatus('Playing...');
  updateButtons();
});
Play the finished piano, record a tune and change anything you like: the full HTML, CSS and JavaScript open pre-loaded in the WSNCode editor. Click the preview once before you use the computer keyboard.
Try It Live in the WSNCode Editor →How I Tested the Piano
A piano is hard to test by reading code, so I tested it in a real browser (Chrome). A script started headless Chrome and played the piano with real mouse, touch and keyboard events, while a small spy watched what the Web Audio graph did. The 73 checks showed, among other things, that no AudioContext exists before the first click and that it is running after it; that every one of the 18 keys has the right frequency (A4 is exactly 440 Hz, C4 is 261.63 Hz); that holding a key plays the note once; that three fingers play three keys and lifting one releases only that key; that a cancelled touch leaves no stuck note; that volume 0 is silent; that a note with a sustain of 2.5 seconds is still ringing 0.7 seconds after release and a note with 0.1 seconds is not; that a recording is replayed in the right order and with the right timing; and that a window losing focus releases every key.
The click test is the one I like most. I rendered a note offline, released it at an arbitrary point of the wave, and measured the biggest jump between two neighbouring samples. With the envelope the biggest jump is about 0.018, which is the normal slope of the wave itself. The same note stopped with no envelope jumps by about 0.52, which is the click you would hear. Finally I opened the code from the Try It Live button in the real WSNCode editor, clicked a key inside the sandboxed preview and confirmed that the audio context runs, that a signal comes out and that the keyboard works. That last test is how I found the preventDefault problem from Step 7. If you want to see the engine at work, add console.log(note, noteFrequency(note)) to startNote. You can learn more in console.log() for beginners.
Ideas to Extend Your JavaScript Piano
- More octaves. Add buttons for C3 to B3 and C6, and shrink
--whitesto match. The formula already knows the frequencies. - Other sounds. Add a select box that sets
osc.typetosine,squareorsawtooth, or add a second, quieter oscillator one octave up for a fuller tone. - A real sustain pedal. Make the Space key keep notes ringing until it is released.
- Precise recording playback. Schedule notes on the audio clock (
audioCtx.currentTime) instead ofsetTimeoutfor perfect timing. - Save songs. Store the
songarray as JSON inlocalStorage(the editor preview blocks storage, so it works best on your own page), or encode it in the URL to share a tune. - Learn a song. Highlight the next key to press and wait for the player, like a piano-teacher app.
Frequently Asked Questions
How do you make a piano in JavaScript?
Build the keys in HTML (one button per note), lay out the black keys on top of the white keys with CSS, and make the sound with the Web Audio API: create an oscillator at the note's frequency and a gain node that fades it in and out. Then call that code from mouse, touch and keyboard events. No audio files are needed.
How do you play a sound in JavaScript without an audio file?
Use the Web Audio API. Create an AudioContext, make an oscillator with ctx.createOscillator(), set its type and frequency, connect it to ctx.destination (through a gain node if you want to control the volume) and call start() and stop(). The browser generates the wave for you.
What is the formula for the frequency of a piano note?
The frequency of piano key number n is 440 * 2 ** ((n - 49) / 12) Hz, where A4 is key 49 and has a frequency of 440 Hz. Every key is one semitone higher than the previous one, which multiplies the frequency by the 12th root of 2, about 1.0595, and 12 keys up (one octave) doubles it.
Why does the Web Audio API not play sound until I click?
Browsers block automatic sound so that pages cannot start playing audio on their own. An AudioContext that is created before the user acts stays in the suspended state. Create it, or call audioCtx.resume(), inside a click, touch or key event handler, and it will start running.
How do you stop the clicking sound when a note starts or ends?
Never switch a tone on or off at full volume. Pass it through a gain node and change the gain gradually: ramp up from a tiny number such as 0.0001 over about 10 milliseconds when the note starts, and ramp down to the same tiny number over some tens of milliseconds before you call stop(). Use exponentialRampToValueAtTime, which cannot start or end at exactly 0.
How do you make multi-touch work on a web piano?
Use pointer events (pointerdown, pointerup) instead of mouse events. Every finger has its own pointerId, so you can remember which key each finger holds and release only that key when the finger lifts. Add touch-action: none to the piano so that the page does not scroll or zoom while you play.
Wrapping Up
You now have a complete piano in JavaScript: 18 keys laid out with CSS, notes calculated with the real frequency formula, a click-free gain envelope, audio that unlocks on the first click, mouse, keyboard and multi-touch play, volume and sustain controls and a recorder. Open it in the WSNCode editor, add an octave or a new sound, and share what you build.
More Game Tutorials
- Tic Tac Toe in JavaScript: a minimax AI that never loses, scores and keyboard play.
- How to Make a Snake Game in JavaScript: canvas drawing, keyboard input and a game loop.
- Flappy Bird Game in JavaScript: gravity, obstacles and collision detection.
- Word Scramble Game in JavaScript: a fair shuffle, a timer and hints.