Flappy Bird Game in JavaScript: Step-by-Step Guide
A one-button bird game is one of the best first projects for learning game development in the browser. The rules fit in one sentence — tap to flap, fly through the gaps, don't touch anything — but building it teaches you the ideas behind almost every 2D game: a game loop, gravity and jump physics, moving obstacles, collision detection, a score and a game-over screen. In this tutorial you will build a complete flappy bird game in JavaScript with the HTML5 canvas, step by step, with no libraries and no images.
A quick note on the name: “Flappy Bird” is a trademark of its owner, and this tutorial is not affiliated with it. What we build here is an original flappy-style game called Sky Hopper, with its own code, drawings and rules. The mechanics are the classic ones people search for when they want a flappy bird clone in JavaScript, which is why we use the term.
You can type along in the free WSNCode online code editor, or open the finished game with one click from the Try It Live button further down. Two things in this tutorial are often skipped by other guides, so pay extra attention to them: frame-rate independent physics (so the game plays the same on a 60 Hz laptop and a 144 Hz gaming monitor) and a clear explanation of AABB collision detection, the four-line check that decides whether the bird hit a pillar.
What You'll Build
Sky Hopper is an HTML5 canvas bird game and a small endless runner: the world scrolls from right to left forever and your only job is to survive. The finished game has:
- A bird that falls with gravity and jumps up a little on every flap (Space, the up arrow, a mouse click or a tap on a phone).
- Pairs of pillars with a gap between them that scroll towards the bird at a random height.
- AABB collision detection against the pillars, plus the ground.
- A score for every pair you pass and a best score saved in the browser.
- A ready screen, a game over screen and a restart with a short safety pause.
- A difficulty ramp: the game gets faster and the gaps get narrower as your score grows.
- Sharp drawing on retina screens and physics that do not depend on the screen's refresh rate.
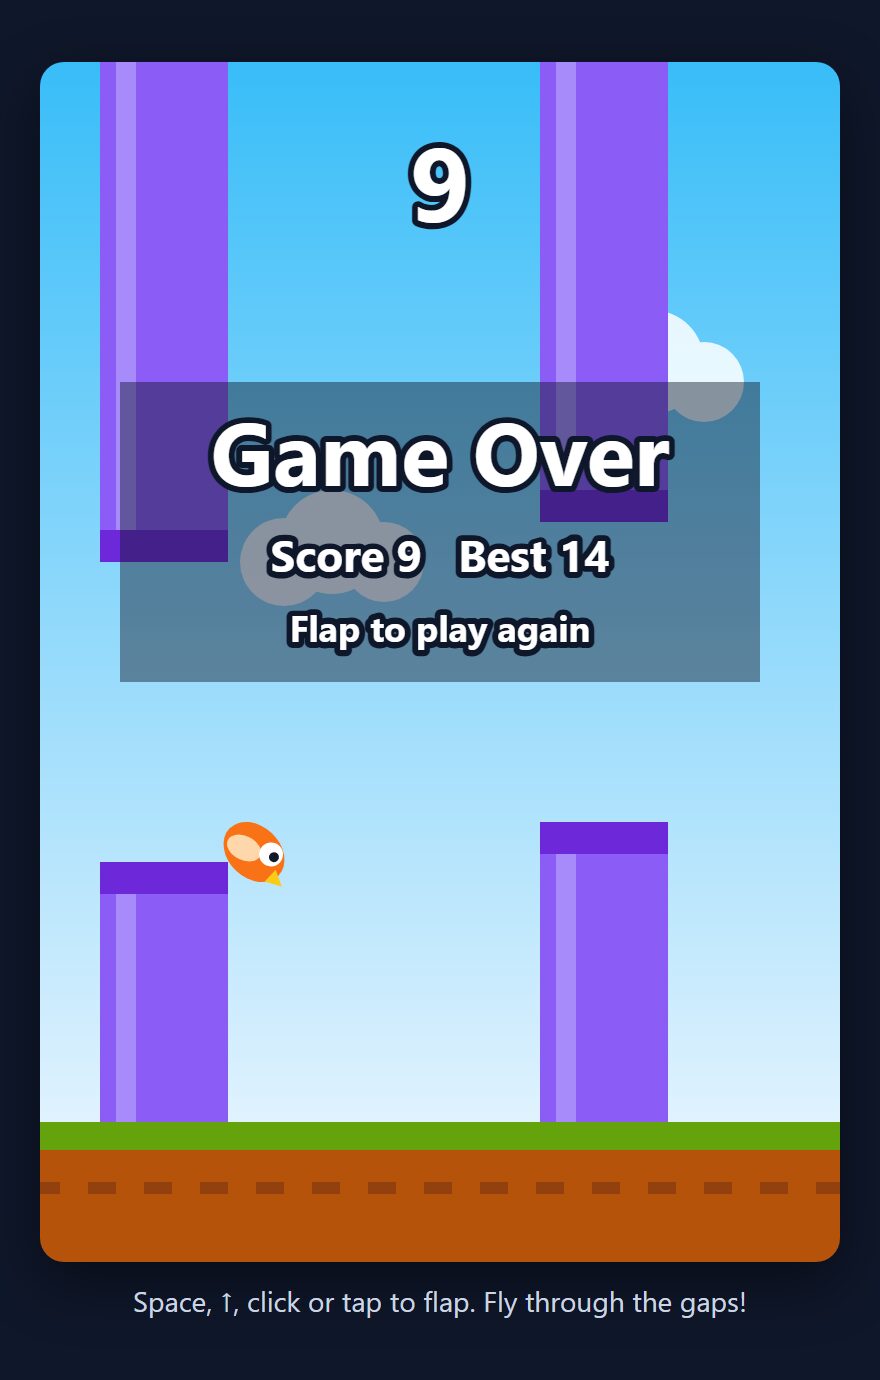
The whole game is about 340 lines of plain JavaScript, with about 30 lines of HTML and CSS.
Where the Idea Comes From: Skyhop on WSNCode
This post was inspired by Skyhop, a community project by Ajwa Fatima that is currently one of the trending projects on the WSNCode Explore page. It is a different and much bigger game than the one in this tutorial: you steer left and right, jump, collect coins and stars, ride rockets for a burst of speed, and it has sound, a pause key, a mute key and a best score. Go and play Skyhop on Explore to see how far a sky-hopping game can go. The code in this article is written from scratch and does not copy any of it; we keep the sky theme and focus on the classic one-button mechanic so every line is easy to follow. If you followed our word scramble game tutorial, which was inspired by another of her projects, this is the next game in the same series.
How the Game Works
Every real-time game is a loop that runs about 60 times per second (or 120, or 144, depending on the screen). On every pass it does two things:
- Update the world: apply gravity, move the bird and the pillars, check for collisions, count the score.
- Draw the world: clear the canvas and paint the sky, pillars, ground, bird and text in their new positions.
On top of that sits a tiny state machine with three states: ready (the bird hovers and waits for the first flap), playing and over. The input handler and the update function both look at the state to decide what to do. If you built the Snake game in JavaScript before, this will feel familiar, with one big difference: Snake moves on a grid in fixed steps, while this game moves smoothly in pixels per second.
Step 1: The HTML
The page needs just one <canvas> and a line of help text. The width and height attributes describe the size of the game world (400 × 600). role="img" with an aria-label gives screen reader users a short description of what the canvas is, because anything drawn on a canvas is invisible to them. If you are new to how the three files fit together, read HTML, CSS and JavaScript Explained first.
<div class="game-wrap">
<canvas id="game" width="400" height="600" role="img"
aria-label="Sky Hopper: press Space, the up arrow, click or tap to flap"></canvas>
<p class="help">Space, ↑, click or tap to flap. Fly through the gaps!</p>
</div>Step 2: The CSS
The CSS centres the game on a dark page. The interesting line is the canvas width: min() picks the smallest of 400 px, 92% of the screen width and two-thirds of the screen height (minus room for the help text), so the whole game always fits on screen, even in the editor's small preview. height: auto keeps the 2:3 shape. touch-action: manipulation stops phones from waiting for a double-tap zoom, which makes taps feel instant.
* { box-sizing: border-box; }

body {
  margin: 0;
  min-height: 100vh;
  display: flex;
  align-items: center;
  justify-content: center;
  background: #0f172a;
  color: #cbd5e1;
  font-family: system-ui, sans-serif;
}

.game-wrap { text-align: center; padding: 12px; }

canvas {
  display: block;
  /* 400px wide at most, but never wider than the screen or taller than it */
  width: min(400px, 92vw, calc((100vh - 70px) * 2 / 3));
  height: auto;
  border-radius: 12px;
  box-shadow: 0 10px 30px rgba(0, 0, 0, 0.45);
  cursor: pointer;
  touch-action: manipulation;
}

.help { margin: 10px 0 0; font-size: 14px; }
Step 3: Canvas Setup for Sharp Retina Graphics
We grab the canvas and its 2D drawing context, then fix a problem many canvas tutorials ignore: on a retina or high-DPI screen, one CSS pixel is two or three physical pixels, so a 400 × 600 canvas gets stretched and looks blurry. The fix is to make the canvas bitmap bigger by devicePixelRatio and scale the context by the same amount. After ctx.scale(dpr, dpr) we can keep thinking in a 400 × 600 world and never mention the ratio again.
// ===== Canvas setup =====
const canvas = document.getElementById('game');
const ctx = canvas.getContext('2d');
const W = 400;              // game world size in CSS pixels
const H = 600;
const GROUND_H = 70;
const GROUND_Y = H - GROUND_H;

// Draw at the screen's real pixel density so it stays sharp on retina screens
const dpr = window.devicePixelRatio || 1;
canvas.width = W * dpr;
canvas.height = H * dpr;
ctx.scale(dpr, dpr);
Step 4: Gravity and Jump Physics in JavaScript
All the numbers that shape the game live in one place. Notice the units: speeds are in pixels per second and gravity is in pixels per second squared. That choice is the key to physics that behave the same on every screen, as you will see in Step 10.
// ===== Settings (pixels and seconds) =====
const GRAVITY = 1400;       // px/s² pulling the bird down
const FLAP_SPEED = -420;    // px/s, the upward kick of one flap
const MAX_FALL = 600;       // px/s, terminal velocity
const PILLAR_W = 64;
const SPAWN_DIST = 220;     // px of scrolling between two pillar pairs
const START_SPEED = 160;    // px/s the world scrolls left
const MAX_SPEED = 260;
const START_GAP = 170;      // px between the top and bottom pillar
const MIN_GAP = 120;
const MAX_SHIFT = 130;      // px the gap centre may move from one pair to the next
const HITBOX_PAD = 3;       // shrink the bird's hitbox a little to feel fair
const BEST_KEY = 'skyHopperBest';
Here is the whole physics model of the game in plain words:
- Gravity adds to the bird's vertical speed every frame:
vy += GRAVITY * dt, wheredtis the time since the last frame in seconds. In canvas coordinates y grows downwards, so a positivevymeans falling. - Movement adds the speed to the position:
y += vy * dt. - A flap does not add to the speed; it replaces it with
FLAP_SPEED(−420). That is why every flap feels the same, whether you were falling fast or already rising. - Terminal velocity (
MAX_FALL) caps the falling speed so a long drop never becomes impossible to recover from.
With these values one flap lifts the bird about 63 px (420² ÷ (2 × 1400)) and brings it back to the same height 0.6 seconds later. Change GRAVITY and FLAP_SPEED together to make the game feel floaty or heavy.
Step 5: Game State, Best Score and Reset
The state variables are declared once and filled in by resetGame(), so starting a new round is a single function call. The bird is a plain object with a position, a size and a vertical speed. The best score is saved in localStorage, wrapped in try...catch: some environments block storage (private windows, and sandboxed iframes such as the WSNCode preview), and without the catch the whole game would crash on the first line instead of just forgetting the best score.
// ===== Game state =====
let state;                  // 'ready' | 'playing' | 'over'
let bird, pillars, score, speed, gap, distSinceSpawn, groundX;
let clock = 0;              // seconds since the page loaded
let overAt = 0;             // clock value when the last game ended
let best = loadBest();

function loadBest() {
  try {
    return Number(localStorage.getItem(BEST_KEY)) || 0;
  } catch (err) {
    return 0;               // storage can be blocked, e.g. in sandboxed iframes
  }
}

function saveBest() {
  try {
    localStorage.setItem(BEST_KEY, String(best));
  } catch (err) {
    // ignore: the best score just won't survive a reload
  }
}

function resetGame() {
  state = 'ready';
  bird = { x: 90, y: H / 2 - 60, w: 34, h: 26, vy: 0 };
  pillars = [];
  score = 0;
  speed = START_SPEED;
  gap = START_GAP;
  distSinceSpawn = SPAWN_DIST;   // spawn the first pair as soon as play starts
  groundX = 0;
}
Step 6: Obstacles (Pillars) at Random Heights
Each obstacle is stored as one object: its x position, the top of the gap, the gap size and a passed flag for scoring. pillarBoxes() turns that into the two rectangles we actually draw and collide with, one above the gap and one below it. Storing gapH on each pillar matters for the difficulty ramp: when the gap shrinks later, pillars that are already on screen keep their size.
// ===== Pillars =====
function spawnPillar() {
  const margin = 60;
  let minTop = margin;
  let maxTop = GROUND_Y - margin - gap;

  // keep the new gap within reach of the previous one
  const prev = pillars[pillars.length - 1];
  if (prev) {
    const prevCenter = prev.gapTop + prev.gapH / 2;
    minTop = Math.max(minTop, prevCenter - MAX_SHIFT - gap / 2);
    maxTop = Math.min(maxTop, prevCenter + MAX_SHIFT - gap / 2);
  }

  const gapTop = minTop + Math.random() * (maxTop - minTop);
  pillars.push({ x: W, gapTop, gapH: gap, passed: false });
}

// Each pillar pair is two rectangles: one above the gap, one below it
function pillarBoxes(p) {
  const gapBottom = p.gapTop + p.gapH;
  return [
    { x: p.x, y: 0, w: PILLAR_W, h: p.gapTop },
    { x: p.x, y: gapBottom, w: PILLAR_W, h: GROUND_Y - gapBottom },
  ];
}
The MAX_SHIFT rule is easy to forget and makes a big difference. Purely random gaps can put one gap near the top and the next one near the bottom. At the highest speed the bird has less than half a second between two pillars, and it simply cannot climb that far — the player dies no matter how good they are. Limiting how far the centre of the gap can move from the previous one keeps every layout possible. To measure it, I let a simple bot play 200 games with the rule and 200 without it: the bot's median score went from 19 to 36, and the share of games that reached the top speed rose from 53 to 166 out of 200. Same bot, fairer level.
Step 7: AABB Collision Detection Explained
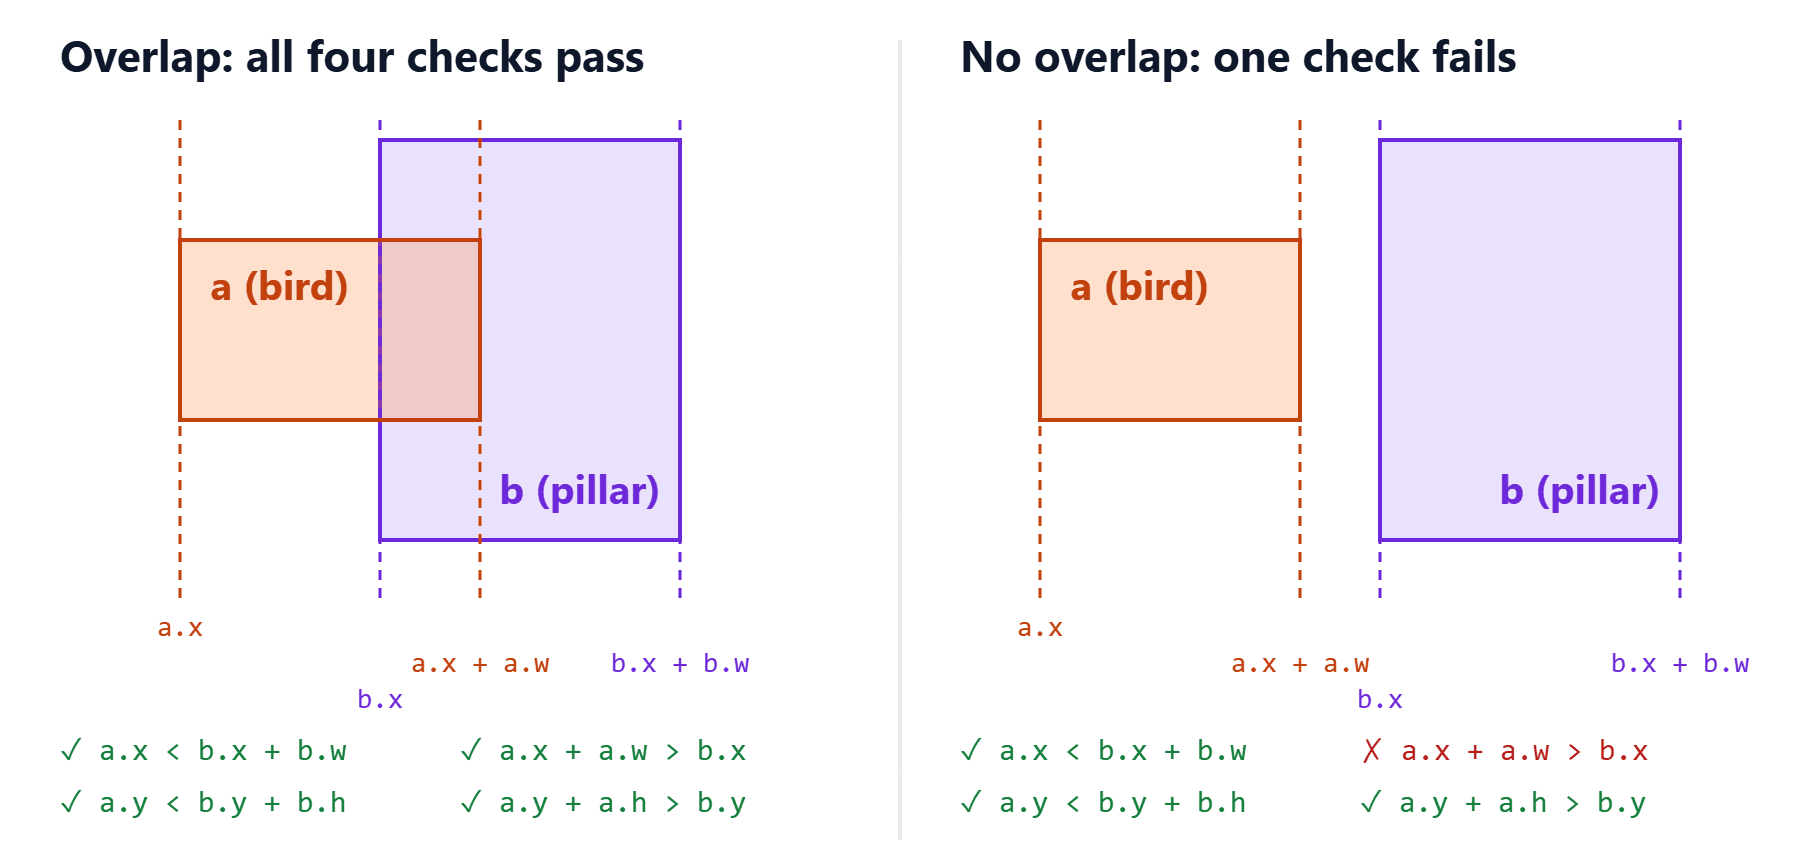
This is the part that decides whether the game feels fair. AABB stands for axis-aligned bounding box: a rectangle whose sides are parallel to the x and y axes (not rotated). Our pillars are exactly that, and the bird is close enough to one that we treat it as a rectangle too. Checking whether two such rectangles overlap is one of the cheapest tests in game development, which is why it is the first HTML5 canvas collision detection technique everyone should learn.
The trick is to think about when two rectangles do not overlap. That happens only if one of them is completely to the left of, to the right of, above or below the other. If none of those four is true, they must overlap. Flip each of the four conditions around and you get the function below. Rectangle a overlaps rectangle b when all four checks pass:
a.x < b.x + b.w— the left edge ofais left of the right edge ofb.a.x + a.w > b.x— the right edge ofais right of the left edge ofb.a.y < b.y + b.h— the top ofais above the bottom ofb.a.y + a.h > b.y— the bottom ofais below the top ofb.
// ===== Collision detection (AABB) =====
function overlaps(a, b) {
  return (
    a.x < b.x + b.w &&   // a's left edge is left of b's right edge
    a.x + a.w > b.x &&   // a's right edge is right of b's left edge
    a.y < b.y + b.h &&   // a's top edge is above b's bottom edge
    a.y + a.h > b.y      // a's bottom edge is below b's top edge
  );
}

function birdBox() {
  return {
    x: bird.x + HITBOX_PAD,
    y: bird.y + HITBOX_PAD,
    w: bird.w - HITBOX_PAD * 2,
    h: bird.h - HITBOX_PAD * 2,
  };
}

function hitsPillar() {
  const box = birdBox();
  return pillars.some(p => pillarBoxes(p).some(r => overlaps(box, r)));
}
Four details make this version solid:
- Strict
<and>. Two boxes that only touch edge to edge do not count as a hit. I tested the exact pixel: with the bird's hitbox ending at x = 121, a pillar starting at 121 is safe and one starting at 120.9 is a crash. - A slightly smaller hitbox. The bird is drawn as an oval, but a box around an oval has empty corners.
HITBOX_PADshrinks the box by 3 px on each side, so the player never dies from a “hit” that visibly missed. Games almost always make the player's hitbox a little forgiving. - What you see is what you hit. The darker bands at the ends of the pillars are drawn inside the pillar rectangles. If you draw a wider cap that sticks out, the bird can fly through the visible cap without dying, which feels like a bug.
- No tunnelling. Collision is only checked once per frame, so a fast object can jump over a thin one between two frames. Here the worst case is small:
dtis capped at 0.05 s, so the pillars move at most 13 px per frame, far less than the 64 px pillar or the 28 px hitbox.
Step 8: The Update Function (Movement, Scoring, Game Over)
update(dt) runs once per frame. In the ready state the bird just bobs up and down on a sine wave. In the over state the bird keeps falling until it lands, and nothing else moves. While playing, it applies gravity, treats the top of the screen as a ceiling, scrolls everything left by speed * dt, spawns a new pillar pair every 220 px, counts the score and checks for a crash.
// ===== Update: physics, scrolling, scoring =====
function applyGravity(dt) {
  bird.vy = Math.min(bird.vy + GRAVITY * dt, MAX_FALL);
  bird.y += bird.vy * dt;
}

function update(dt) {
  if (state === 'ready') {
    bird.y = H / 2 - 60 + Math.sin(clock * 4) * 6;   // gentle hover
    groundX += START_SPEED * dt;
    return;
  }

  if (state === 'over') {
    // let the bird drop to the ground, everything else is frozen
    if (bird.y + bird.h < GROUND_Y) {
      applyGravity(dt);
      bird.y = Math.min(bird.y, GROUND_Y - bird.h);
    }
    return;
  }

  applyGravity(dt);
  if (bird.y < 0) {          // the sky is a ceiling, not a wall of death
    bird.y = 0;
    bird.vy = 0;
  }

  const move = speed * dt;
  groundX += move;
  distSinceSpawn += move;
  if (distSinceSpawn >= SPAWN_DIST) {
    distSinceSpawn -= SPAWN_DIST;
    spawnPillar();
  }

  for (const p of pillars) {
    p.x -= move;
    if (!p.passed && p.x + PILLAR_W < bird.x) {
      p.passed = true;
      score++;
      rampDifficulty();
    }
  }
  pillars = pillars.filter(p => p.x + PILLAR_W > 0);   // drop off-screen pairs

  if (hitsPillar() || bird.y + bird.h >= GROUND_Y) {
    gameOver();
  }
}
Scoring uses the passed flag so each pair counts exactly once: the moment a pillar's right edge is left of the bird, it is behind us and we add a point. Pillars that leave the screen are removed with filter, so the array never holds more than three pairs. If filter, some and find are new to you, our guide to JavaScript array methods explains them with small examples.
Step 9: Difficulty That Ramps Up Over Time
A good endless runner starts easy and slowly gets harder. Every time the score goes up, the scroll speed grows by 4 px/s and the gap shrinks by 2 px, until they hit their limits at a score of 25 (260 px/s and a 120 px gap). Because pillars spawn every 220 pixels rather than every so many seconds, the spacing between pillars stays the same while everything speeds up.
// ===== Difficulty ramp =====
function rampDifficulty() {
  speed = Math.min(MAX_SPEED, START_SPEED + score * 4);
  gap = Math.max(MIN_GAP, START_GAP - score * 2);
}
Step 10: Input, Game Over and Restart
One function, flap(), handles every input and every state. On the ready screen the first flap starts the game. On the game over screen a flap restarts, but only after half a second, because players are usually still tapping wildly when they crash and would otherwise skip the game-over screen by accident. Space and the up arrow work on the keyboard; preventDefault() stops Space from scrolling the page and e.repeat ignores the automatic repeats you get when a key is held down. pointerdown covers the mouse, touch and pen with one event.
// ===== Game over and input =====
function gameOver() {
  state = 'over';
  overAt = clock;
  bird.y = Math.min(bird.y, GROUND_Y - bird.h);   // don't sink into the ground
  if (score > best) {
    best = score;
    saveBest();
  }
}

function flap() {
  if (state === 'over') {
    if (clock - overAt > 0.5) resetGame();   // short pause so a panic tap doesn't restart
    return;
  }
  if (state === 'ready') state = 'playing';
  bird.vy = FLAP_SPEED;
}

window.addEventListener('keydown', e => {
  if (e.code === 'Space' || e.code === 'ArrowUp') {
    e.preventDefault();      // stop Space from scrolling the page
    if (!e.repeat) flap();   // holding the key down is not a stream of flaps
  }
});

canvas.addEventListener('pointerdown', e => {
  e.preventDefault();
  flap();
});
Step 11: Drawing with the Canvas API
Everything is drawn with rectangles, circles, ellipses and one triangle, so the game needs no image files. The bird tilts with its speed: nose up while rising, nose down while falling, using ctx.save(), translate(), rotate() and restore() so the rotation only affects the bird. The clouds move at 30% of the ground speed, a simple parallax effect that adds depth for free. The score is drawn with strokeText and then fillText, which gives white text a dark outline that stays readable on any background.
// ===== Drawing =====
function drawSky() {
  const sky = ctx.createLinearGradient(0, 0, 0, GROUND_Y);
  sky.addColorStop(0, '#38bdf8');
  sky.addColorStop(1, '#e0f2fe');
  ctx.fillStyle = sky;
  ctx.fillRect(0, 0, W, GROUND_Y);

  // three clouds that drift slower than the pillars (parallax)
  ctx.fillStyle = 'rgba(255, 255, 255, 0.85)';
  for (let i = 0; i < 3; i++) {
    const x = W - ((groundX * 0.3 + i * 160) % (W + 120)) + 60;
    const y = 70 + i * 90;
    ctx.beginPath();
    ctx.arc(x, y, 22, 0, Math.PI * 2);
    ctx.arc(x + 24, y - 10, 26, 0, Math.PI * 2);
    ctx.arc(x + 50, y, 20, 0, Math.PI * 2);
    ctx.fill();
  }
}

function drawPillars() {
  for (const p of pillars) {
    for (const r of pillarBoxes(p)) {
      ctx.fillStyle = '#8b5cf6';
      ctx.fillRect(r.x, r.y, r.w, r.h);
      ctx.fillStyle = '#a78bfa';
      ctx.fillRect(r.x + 8, r.y, 10, r.h);          // highlight stripe
    }
    // darker bands at the edges of the gap, drawn inside the hitbox
    ctx.fillStyle = '#6d28d9';
    ctx.fillRect(p.x, p.gapTop - 16, PILLAR_W, 16);
    ctx.fillRect(p.x, p.gapTop + p.gapH, PILLAR_W, 16);
  }
}

function drawGround() {
  ctx.fillStyle = '#65a30d';
  ctx.fillRect(0, GROUND_Y, W, 14);
  ctx.fillStyle = '#b45309';
  ctx.fillRect(0, GROUND_Y + 14, W, GROUND_H - 14);
  ctx.fillStyle = '#92400e';
  const offset = groundX % 28;
  for (let x = -offset; x < W; x += 28) {
    ctx.fillRect(x, GROUND_Y + 30, 14, 6);
  }
}

function drawBird() {
  const tilt = Math.max(-0.45, Math.min(1.1, bird.vy / 500));   // nose up / nose down
  ctx.save();
  ctx.translate(bird.x + bird.w / 2, bird.y + bird.h / 2);
  ctx.rotate(state === 'ready' ? 0 : tilt);

  ctx.fillStyle = '#f97316';                                    // body
  ctx.beginPath();
  ctx.ellipse(0, 0, bird.w / 2, bird.h / 2, 0, 0, Math.PI * 2);
  ctx.fill();

  const wingUp = bird.vy < 0 ? -5 : 2;                          // wing
  ctx.fillStyle = '#fed7aa';
  ctx.beginPath();
  ctx.ellipse(-5, wingUp, 9, 6, -0.3, 0, Math.PI * 2);
  ctx.fill();

  ctx.fillStyle = '#fff';                                       // eye
  ctx.beginPath();
  ctx.arc(7, -5, 6, 0, Math.PI * 2);
  ctx.fill();
  ctx.fillStyle = '#111827';
  ctx.beginPath();
  ctx.arc(9, -5, 2.5, 0, Math.PI * 2);
  ctx.fill();

  ctx.fillStyle = '#facc15';                                    // beak
  ctx.beginPath();
  ctx.moveTo(14, -1);
  ctx.lineTo(22, 3);
  ctx.lineTo(14, 7);
  ctx.closePath();
  ctx.fill();
  ctx.restore();
}

function outlinedText(text, x, y, size) {
  ctx.font = `bold ${size}px system-ui, sans-serif`;
  ctx.textAlign = 'center';
  ctx.lineJoin = 'round';
  ctx.lineWidth = 6;
  ctx.strokeStyle = '#0f172a';
  ctx.fillStyle = '#fff';
  ctx.strokeText(text, x, y);
  ctx.fillText(text, x, y);
}

function drawText() {
  if (state === 'ready') {
    outlinedText('Sky Hopper', W / 2, 170, 46);
    outlinedText('Space, click or tap to flap', W / 2, 215, 20);
    outlinedText('Best: ' + best, W / 2, 250, 20);
    return;
  }
  outlinedText(String(score), W / 2, 80, 52);
  if (state === 'over') {
    ctx.fillStyle = 'rgba(15, 23, 42, 0.45)';
    ctx.fillRect(40, 160, W - 80, 150);
    outlinedText('Game Over', W / 2, 212, 44);
    outlinedText('Score ' + score + '   Best ' + best, W / 2, 255, 22);
    outlinedText('Flap to play again', W / 2, 290, 18);
  }
}

function draw() {
  drawSky();
  drawPillars();
  drawGround();
  drawBird();
  drawText();
}
Step 12: The requestAnimationFrame Game Loop
requestAnimationFrame asks the browser to call our function right before the next screen refresh, and passes it a high-precision timestamp in milliseconds. The requestAnimationFrame game loop turns the difference between two timestamps into dt in seconds, updates, draws and asks for the next frame. dt is capped at 0.05 s: when you switch tabs the browser pauses the loop, and without the cap the first frame back would be several seconds long and the bird would teleport into the ground.
// ===== Game loop =====
let last = performance.now();

function loop(now) {
  // seconds since the last frame, capped so a background tab can't cause a huge jump
  const dt = Math.min(Math.max((now - last) / 1000, 0), 0.05);
  last = now;
  clock += dt;
  update(dt);
  draw();
  requestAnimationFrame(loop);
}

resetGame();
requestAnimationFrame(loop);
Why dt matters: the refresh-rate bug
Many flappy bird tutorials write the physics in “per frame” units, like this:
// Common version: numbers are "per frame", not "per second"
bird.vy += 0.4;   // gravity
bird.y += bird.vy;
That looks fine on a 60 Hz screen. But requestAnimationFrame runs at the screen's refresh rate, so on a 144 Hz monitor this code runs 2.4 times as often, and the effect of gravity grows with the square of the number of frames. I simulated half a second of falling from rest at both refresh rates:
0.5 s of falling from rest     60 Hz     144 Hz
per-frame physics (above)      186 px    1051 px
delta-time physics (this post) 176 px     174 px
With per-frame numbers, the bird on a 144 Hz screen falls more than five times as far and a flap (with a per-frame flap speed of −7) lasts 0.24 s instead of 0.57 s — the game becomes unplayable. With delta time, the two results differ by about 3 px and a flap lasts 0.6 s on both. That is the reason every speed in this game is written per second and multiplied by dt.
Play the finished flappy-style game and change anything you like: the full HTML, CSS and JavaScript open pre-loaded in the WSNCode editor.
Try It Live in the WSNCode Editor →How I Tested the Game
Before publishing, I ran the game code in Node.js with a fake canvas and a simulated clock, which makes it possible to test game rules without a browser. The tests check that: the four AABB checks give the right answer for overlapping, touching, separate and crossing boxes; gravity stops at terminal velocity and the ceiling stops the bird; hitting the ground or a pillar ends the game; a key held down does not flap repeatedly; restart is blocked for half a second; every generated gap stays inside the screen and within MAX_SHIFT of the previous one; the speed and gap reach exactly 260 and 120 at a score of 25; the best score is saved; and the game still runs when localStorage throws an error. While writing these tests I found two real bugs that are fixed in the code above: the bird could end up a few pixels inside the ground after a crash, and without MAX_SHIFT some layouts were impossible. You can add your own checks with a few console.log() calls in the editor to watch bird.vy, speed and gap change.
Ideas to Extend Your Flappy Bird Clone
- Sound effects. Play a short blip on every flap and point and a thud on a crash with the Web Audio API, plus a mute key.
- Medals. Show a bronze, silver or gold medal on the game over screen at 10, 20 and 40 points.
- Moving gaps. Past a score of 30, let some gaps slide slowly up and down with
Math.sin. - Pause. Add a
pausedstate on the P key, and pause automatically on thevisibilitychangeevent. - Sprites. Replace the drawn bird with a small sprite sheet and switch frames to animate the wings.
- Pixel-perfect or circle collision. Use a circle-versus-rectangle test for the bird for an even fairer hitbox, and keep AABB as a quick first check.
- Different worlds. Swap the colours and speed for a night level or an underwater level every 50 points.
- More games. Try the Snake game tutorial for grid-based movement and the word scramble game in JavaScript for a timer, hints and a fair shuffle.
Frequently Asked Questions
How do you make a flappy bird game in JavaScript?
Draw the game on an HTML5 canvas and run a requestAnimationFrame loop that updates and redraws it every frame. Give the bird a vertical speed that gravity increases every frame and that a flap sets to a negative value, scroll pairs of obstacles with a random gap from right to left, end the game when the bird's rectangle overlaps an obstacle or the ground, and add a point for every pair the bird passes.
How does AABB collision detection work?
Two axis-aligned rectangles overlap when all four of these are true: a.x < b.x + b.w, a.x + a.w > b.x, a.y < b.y + b.h and a.y + a.h > b.y. If any one of them is false, one rectangle is completely to the left of, to the right of, above or below the other, so they cannot touch.
How do you add gravity and jump physics in JavaScript?
Store a vertical speed. Every frame, add gravity times the frame time to the speed and add the speed times the frame time to the position. For a jump or flap, set the speed to a fixed negative value (upwards on a canvas). Use units per second and multiply by the frame time, so the game behaves the same on 60 Hz and 144 Hz screens.
Why does my canvas game run faster on some computers?
requestAnimationFrame runs once per screen refresh, which is 60 times per second on many laptops but 120 or 144 on others. If your code moves things by a fixed number of pixels per frame, faster screens run the game faster. Measure the time between frames with the timestamp that requestAnimationFrame passes in, and multiply every speed and acceleration by it.
Wrapping Up
You now have a complete flappy-style game in JavaScript: a canvas that stays sharp on retina screens, gravity and jump physics that behave the same at any refresh rate, obstacles that are random but always possible, AABB collision detection with a fair hitbox, a score and best score, a game over screen with a safe restart, and a difficulty curve. Open it in the WSNCode editor, change the numbers in the settings block, and see how much the feel of the game changes. When you have made it your own, save it and share it — maybe it will end up next to Skyhop on the Explore page.